
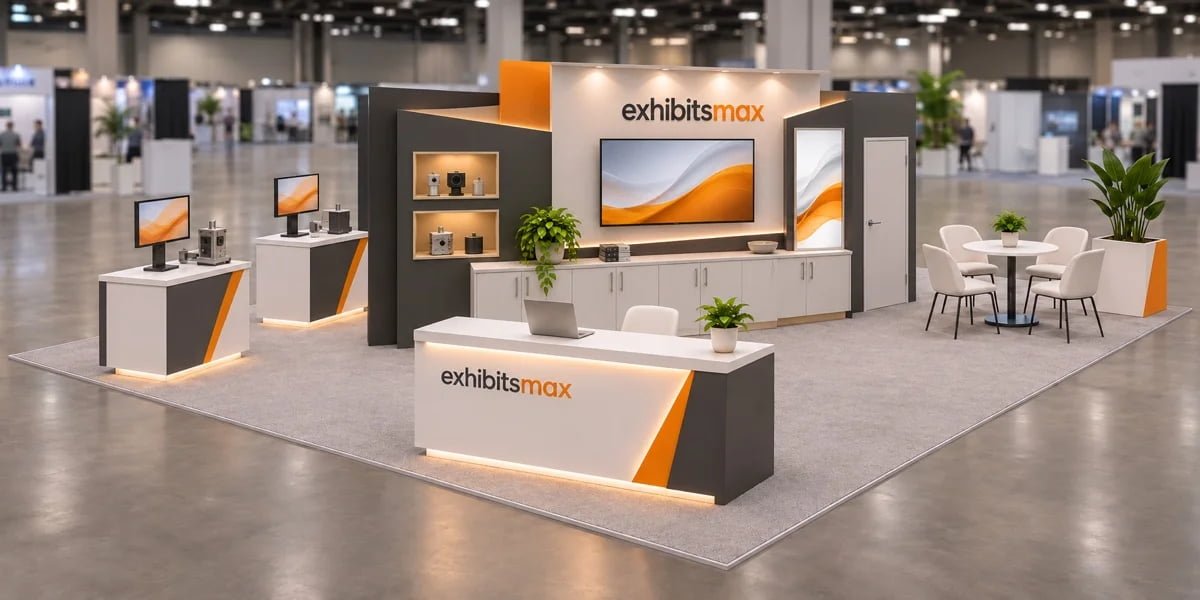
A 20×40 custom trade show booth provides 800 square feet for demonstrations, product displays, meetings, and staff operations. The design challenge is deciding how these activities will work together while keeping the space easy to enter and navigate.
Start with the equipment, conversations, and visitor experience your exhibit needs to support. Then develop the structure, branding, lighting, and service plan around those requirements. Below are three practical layout approaches and two real Exhibitsmax projects that show different ways to organize this footprint.
What Makes a Good 20×40 Custom Booth Design?
A useful plan gives each major activity enough space to operate, including the people around it. A demonstration station needs room for its equipment, presenter, and audience. A meeting area needs occupied chairs and access routes. Storage needs a door that staff can open without interrupting visitors.
Confirm the assigned configuration before designing the floor plan. 20×40 describes the dimensions; it does not automatically mean four open sides. The island layouts below assume aisles on all four sides. A peninsula or another configuration will require changes to entrances, walls, sightlines, and circulation.
Our 20×40 trade show booths page provides additional project references and service options. Use this guide to decide which layout functions belong in your brief.
Three Practical 20×40 Booth Layouts
These are planning approaches, not fixed packages. Combine elements only after checking equipment dimensions, staffing, expected visitor groups, and the current show’s requirements.
| Layout | Space organization | Best fit | Main tradeoff |
|---|---|---|---|
| Product Demonstration Island | Demo stations along the long axis; audience space and a separate follow-up area | Technology, industrial equipment, and electronics | Equipment and queues can consume circulation space |
| Meeting & Hospitality Island | Open reception, screened meeting zones, and shared staff support | B2B exhibitors with scheduled conversations | Privacy can reduce visibility and spontaneous access |
| Multi-Product Display Island | Distinct product zones linked by a shared visitor route | Companies presenting several product lines or brands | Too many displays can fragment the message |
On smaller screens, swipe the table horizontally.
1. Product Demonstration Island
Use the 40-foot length to separate demonstrations rather than clustering every activity around one counter. For example, place two demo stations toward one end, reception near a primary approach, and a compact follow-up meeting area at the opposite end. Position storage where staff can reach it without crossing the demonstration audience.
Draw equipment operating areas, access panels, cable routes, and audience positions before sizing the display structures. Large equipment may need delivery and placement before surrounding booth components are installed.
Why it works: Visitors can move from a demonstration to a focused conversation. Watch for: Competing audio, queues extending into aisles, or a machine that fits on the drawing but leaves insufficient room to operate.
2. Meeting & Hospitality Island
Use one part of the footprint for semi-private meetings and keep another part open for introductions and short conversations. A shared reception point can direct scheduled visitors while product displays give walk-in attendees a reason to stop.
Test the plan with chairs pulled out, doors open, and staff serving the meeting areas. Screens or partitions can provide visual separation, but they do not automatically create acoustic privacy. Any refreshments, water, or food service should be checked against the event and venue arrangements.
Why it works: Different conversation lengths can coexist. Watch for: Enclosed rooms taking over the booth or creating a blank exterior that makes the exhibit feel closed.
3. Multi-Product Display Island
Group products by use case or product family. Place clearly identified zones around a shared circulation route, with reception and meeting space serving the whole booth. A central feature can help organize the exhibit, provided visitors can see where to go next.
Give each zone an intentional display capacity rather than dividing the floor equally. A small product may need close viewing and secure cases; a larger product may need room for hands-on interaction. Use a consistent graphic hierarchy to connect the zones.
Why it works: Visitors can find relevant products without reviewing the entire catalog. Watch for: A continuous perimeter counter, narrow gaps, or competing brand messages that obscure the main offer.
How to Plan Traffic Flow in an 800 Sq. Ft. Booth
The footprint is 40 feet long but still only 20 feet deep. Adding counters along both long edges can quickly reduce the usable space between them. Plan the visitor route with furniture and equipment occupied, not as an empty architectural drawing.
- Map approaches: Use the actual floor plan to identify likely arrival directions, neighboring exhibits, and nearby attractions.
- Preserve entry points: Set reception counters where staff can greet visitors without blocking an approach.
- Separate stopping from passing: Keep demo audiences and waiting visitors out of the route to meetings and other displays.
- Plan staff access: Include storage doors, replenishment, equipment servicing, and concealed cable distribution.
- Check required clearances: Review accessible routes, exits, equipment safety needs, and show-specific requirements with the responsible parties.
A trade show booth design review should include an annotated floor plan alongside the 3D views. Renderings communicate appearance; the dimensioned plan tests whether the layout works.
Real Exhibitsmax 20×40 Booth Design Examples
The following projects are documented in the Exhibitsmax portfolio. Each includes a design rendering and a completed-booth photograph. They illustrate layout choices; they do not establish a standard project price or measured sales result.
Ultimate — PRINTING United 2023 — Atlanta
Size: 20×40. Venue: Georgia World Congress Center.
The Ultimate exhibit combined a large cutting-equipment display with software demonstration monitors, counters, and seating. An overhead sign provided branding above the equipment and presentation areas. The portfolio documents custom-fabricated components and rental elements, graphics, transportation, hanging-sign coordination, and installation and dismantling.
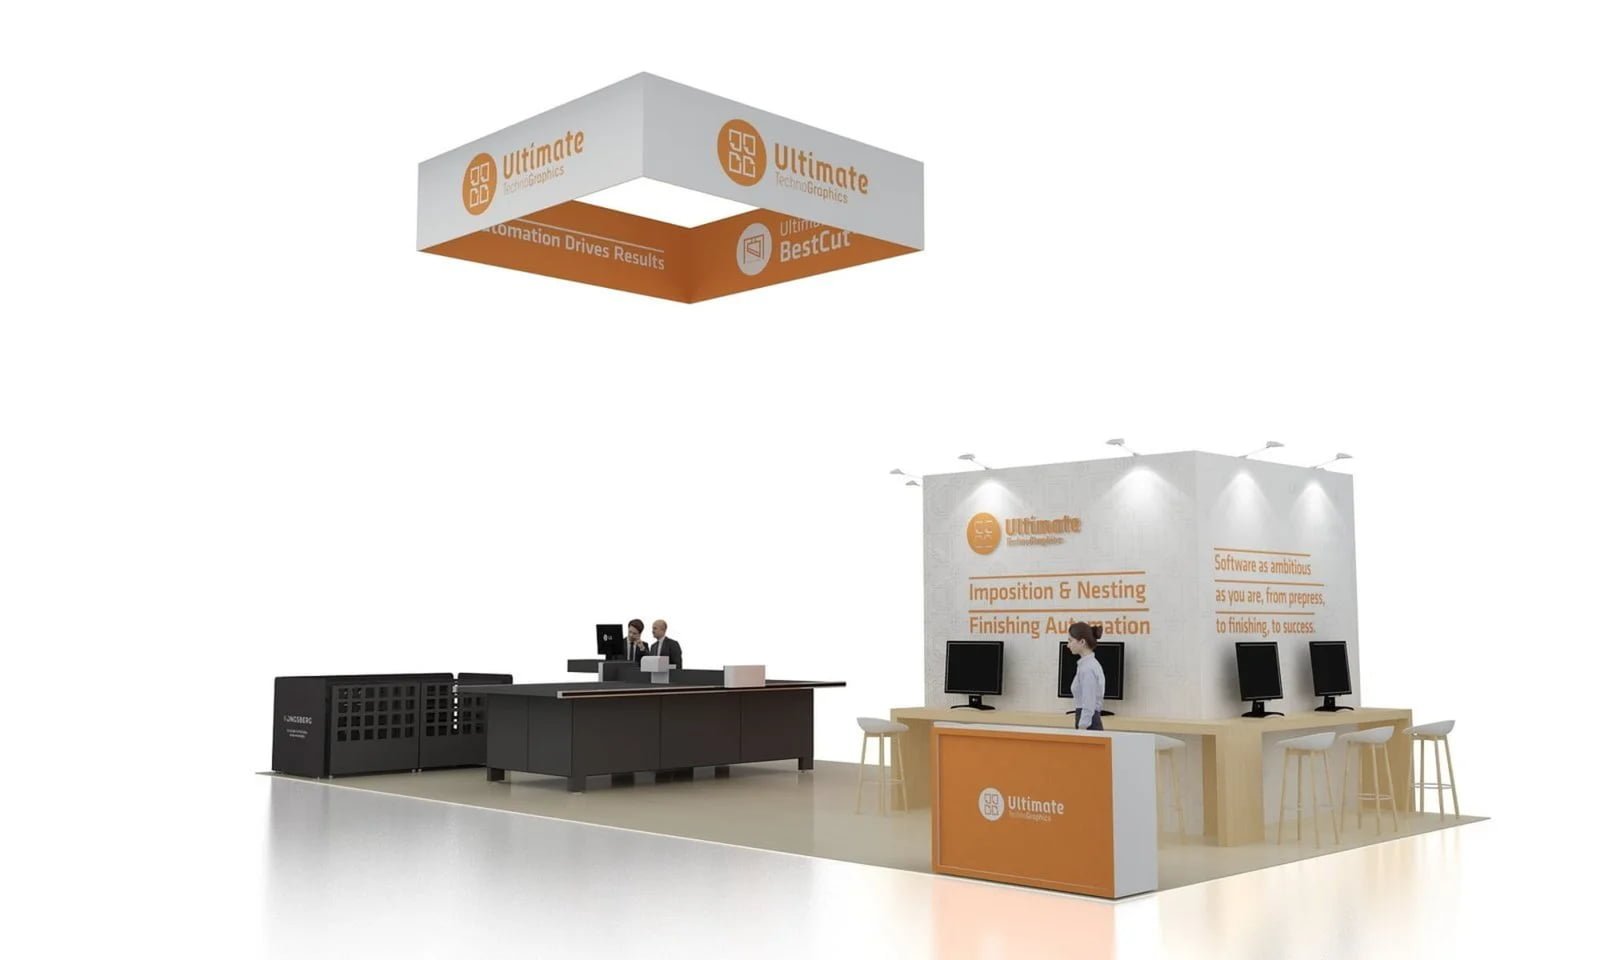
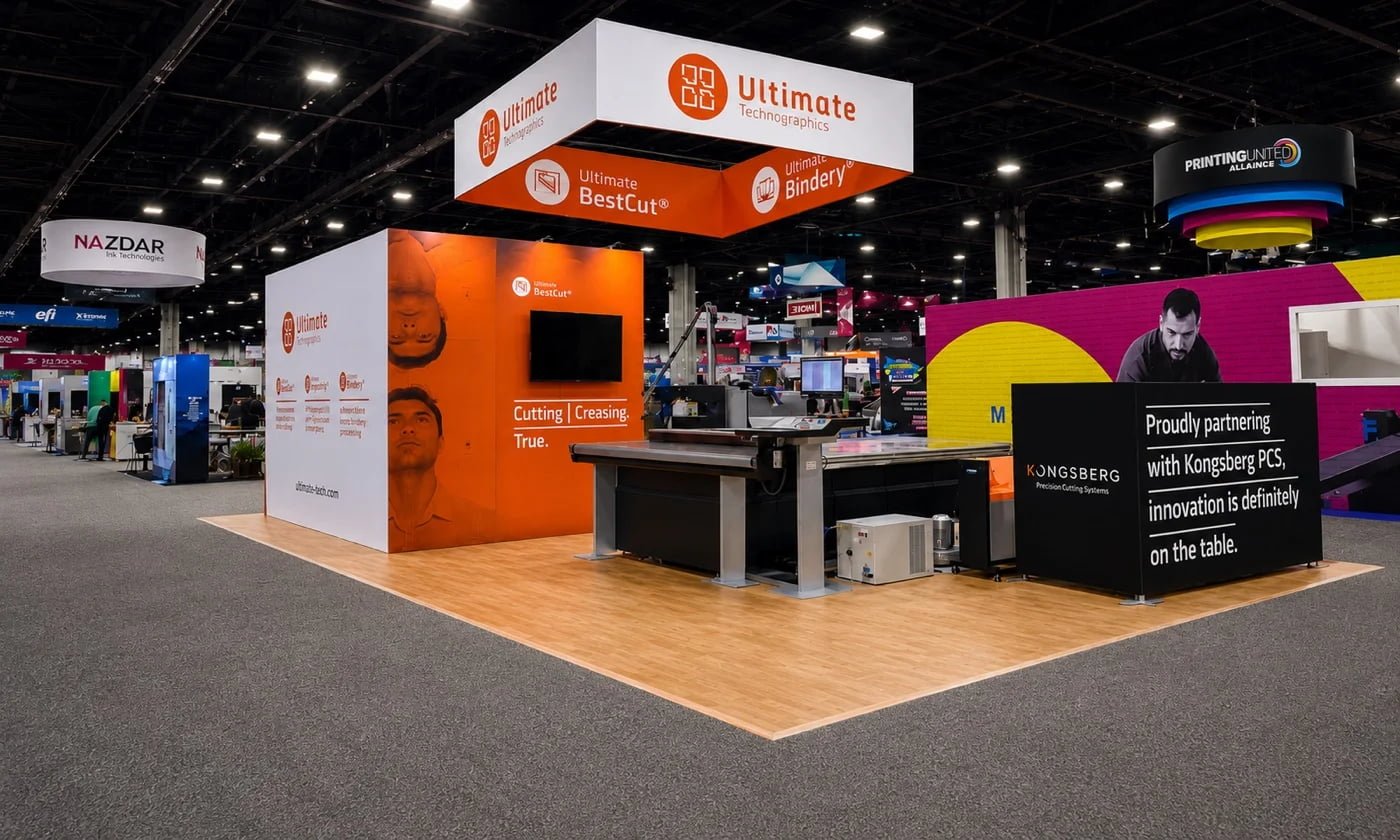
Design takeaway: Plan large equipment and its operating envelope first, then connect that demonstration to software stations and visitor conversations. The project shows why equipment placement and booth construction need to be coordinated.
View the Ultimate 20×40 project →
Starbuzz — TPE 2024 — Las Vegas
Size: 20×40. Venue: Las Vegas Convention Center.
The Starbuzz exhibit organized glass display counters and separate seating areas around a central branded structure. Wall-mounted screens and a circular hanging sign supported the visual hierarchy. The documented scope included design visualization, fabrication, graphics, pre-show assembly, transportation, and installation and dismantling.
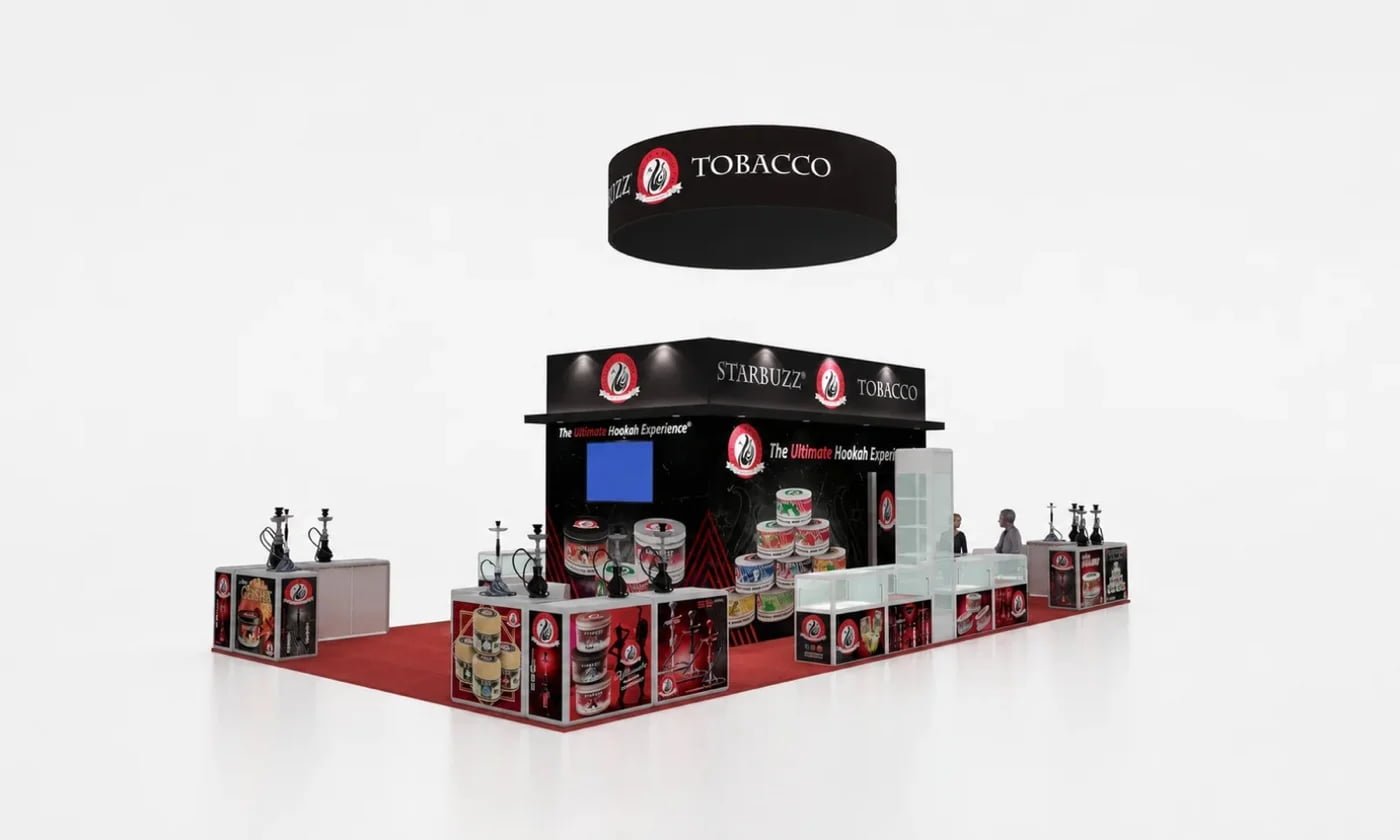
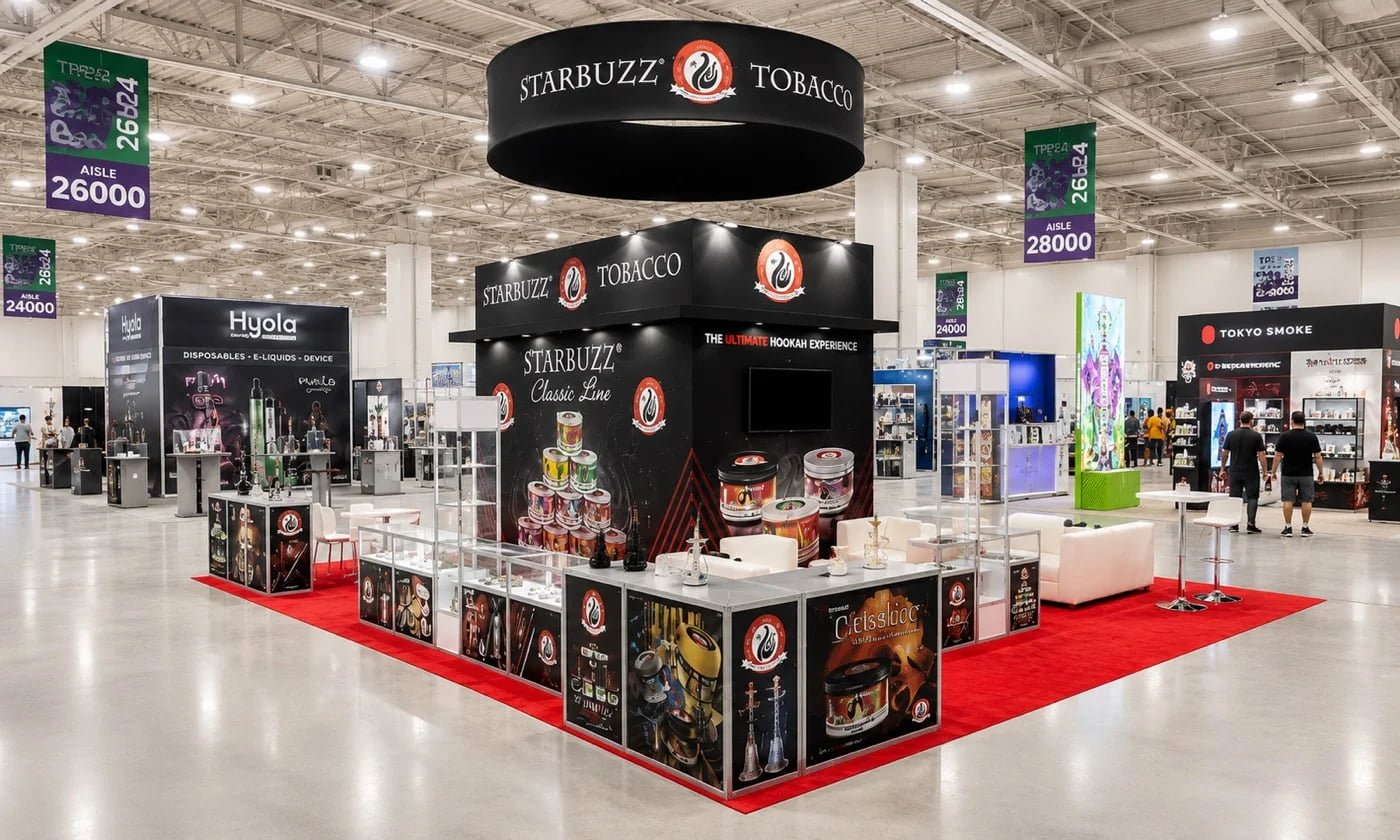
Design takeaway: A central structure can organize several display and conversation areas within a long footprint. Check the routes between that structure, the cases, and occupied seating so the zoning does not create bottlenecks.
View the Starbuzz 20×40 project →
What Affects 20×40 Booth Design Costs?
Size alone is not a reliable price guide. Two 20×40 booths can have very different fabrication, freight, labor, and show-service requirements. Compare proposals against the same drawings, equipment list, responsibilities, and show schedule.
| Cost driver | What to clarify |
|---|---|
| Structure and finishes | Custom components, materials, finish quality, connection details, and reusable elements |
| Graphics, lighting, and AV | Graphic area, lightboxes, screens, equipment rental, wiring, and testing scope |
| Freight and material handling | Packed weight and volume, crate count, route, receiving method, and current show rates |
| Installation and dismantling | Crew scope, supervision, equipment, schedule, and potential overtime |
| Official show services | Electrical, rigging, internet, and other services ordered separately or coordinated through the builder |
| After-show use | Return freight, storage, repairs, graphic refresh, and adaptation for later shows |
On smaller screens, swipe the table horizontally.
Material choices affect more than the fabrication line item. Review the trade show booth materials guide when comparing custom finishes, transport requirements, and reuse. Ask for a scope-based quote that identifies inclusions, exclusions, assumptions, and change-order terms.
Buildability, Rigging & Installation
Before production, translate the concept into component dimensions, assembly details, service locations, and a practical installation sequence. Exhibitsmax’s Las Vegas-based custom booth fabrication operation supports design development, production, graphics, and pre-show assembly according to the agreed scope.
A hanging sign is optional, not an automatic requirement for a 20×40 booth. When proposed, confirm eligibility, allowable height, suspension information, approvals, and the authorized provider with the current exhibitor manual. Structural documentation depends on the actual design and applicable requirements.
Coordinate large equipment placement, underfloor services, booth assembly, graphics, AV testing, and final inspection. Freight planning, service orders, and labor coordination can proceed in parallel with design, but unresolved dependencies must be addressed before execution. Build the schedule backward from confirmed receiving and move-in dates rather than assuming a fixed production or installation allowance.
20×40 vs. 20×30: Which Size Fits Your Goals?
A 20×40 booth adds 200 square feet compared with a 20×30 footprint. The extra length can accommodate another demonstration, separate meeting activity, or more generous circulation. It is valuable when it solves a defined operational need.
A 20×30 may be sufficient when the equipment list is focused and display, meeting, and staffing needs fit comfortably. Moving to 20×40 does not automatically require a larger hanging sign, more elaborate architecture, or a higher staffing level. Test both layouts against the same brief, then compare the complete cost and responsibilities.
For smaller-footprint alternatives, see our 20×30 custom island booth design guide.
Frequently Asked Questions
Is every 20×40 trade show booth an island booth?
No. Dimensions and configuration are separate. Confirm the number of open sides, neighboring spaces, and assigned booth type on the official floor plan before using an island layout.
How many demo stations or meeting areas fit in 800 square feet?
There is no universal count. Equipment size, audience space, occupied seating, storage, accessible routes, and service access determine capacity. Evaluate the full operating layout rather than counting furniture symbols.
Does a 20×40 custom booth need a hanging sign?
No. Floor-supported branding may meet the design goal. If overhead signage is proposed, check the show’s eligibility, approval process, service responsibilities, and costs before committing.
How much does a 20×40 custom booth cost?
The total depends on design scope, materials, equipment, freight, labor, show services, and reuse plans. Request a project-specific quote and confirm whether installation, dismantling, transportation, and official service charges are included or separately ordered.
Can a 20×40 booth be adapted for a future 20×30 space?
Potentially, if the design anticipates different footprints. Identify which components can be removed or rearranged, and review graphics, services, stability, and circulation for each configuration. Do not assume a completed booth can simply be shortened.