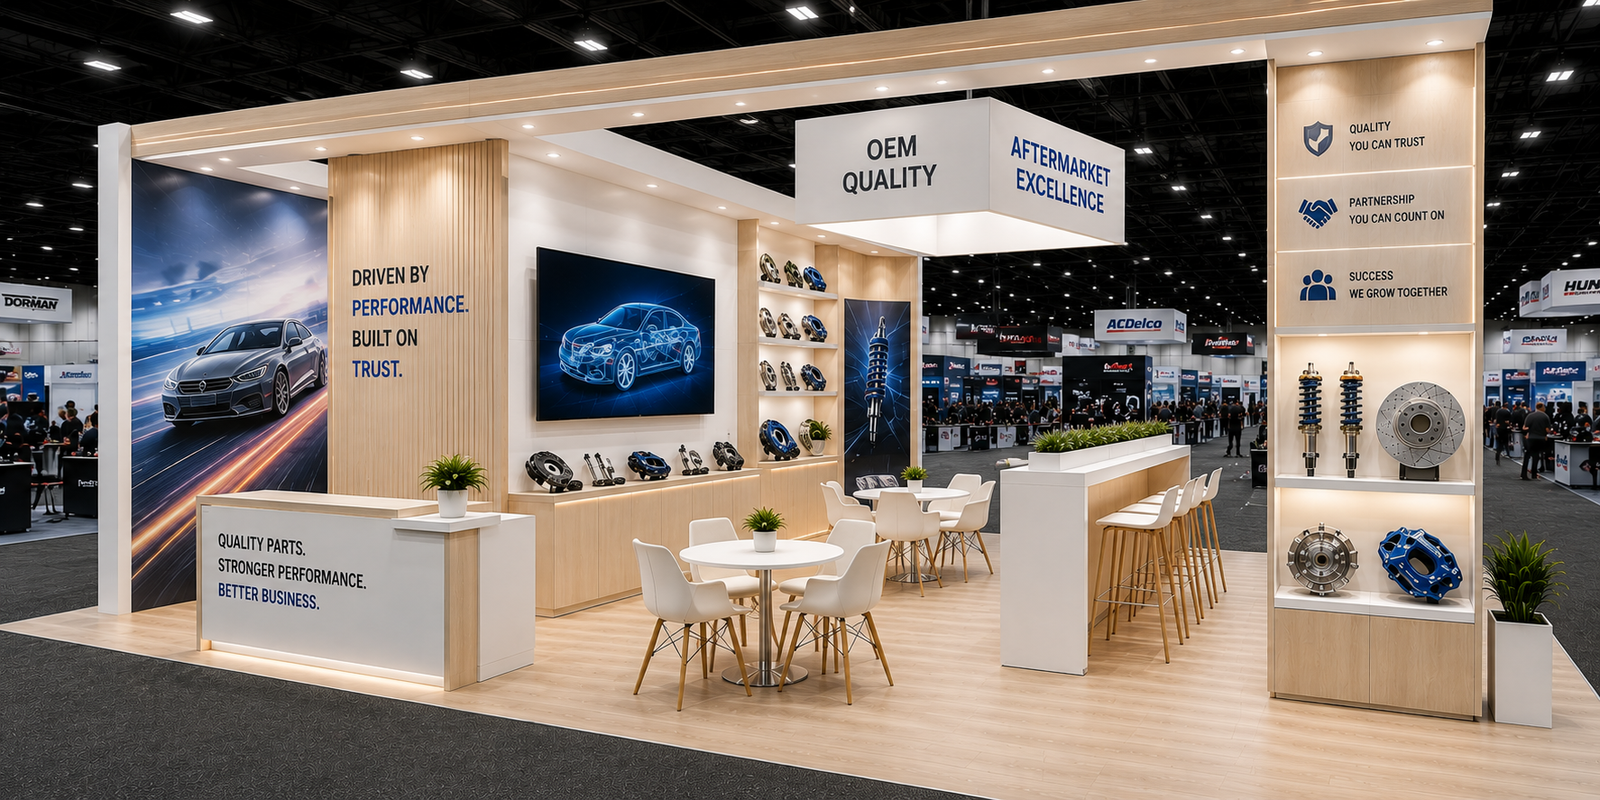
AAPEX booth design looks simple until it meets real-world constraints. The problem is that many exhibits focus on looks and ignore flow, rules, and buildability. That gets expensive fast. The fix is a process that ties goals to layout, respects AAPEX specifics, and engineers details upfront so your booth becomes a business tool, not a gamble.
AAPEX booth design works best when you start with measurable goals, design for traffic and lead capture, and engineer every element to AAPEX’s rules and venue constraints. Align layout to objectives, choose materials for strength and drayage efficiency, plan electrical and rigging early, and budget realistically. That delivers impact, compliance, and lower on-site risk.
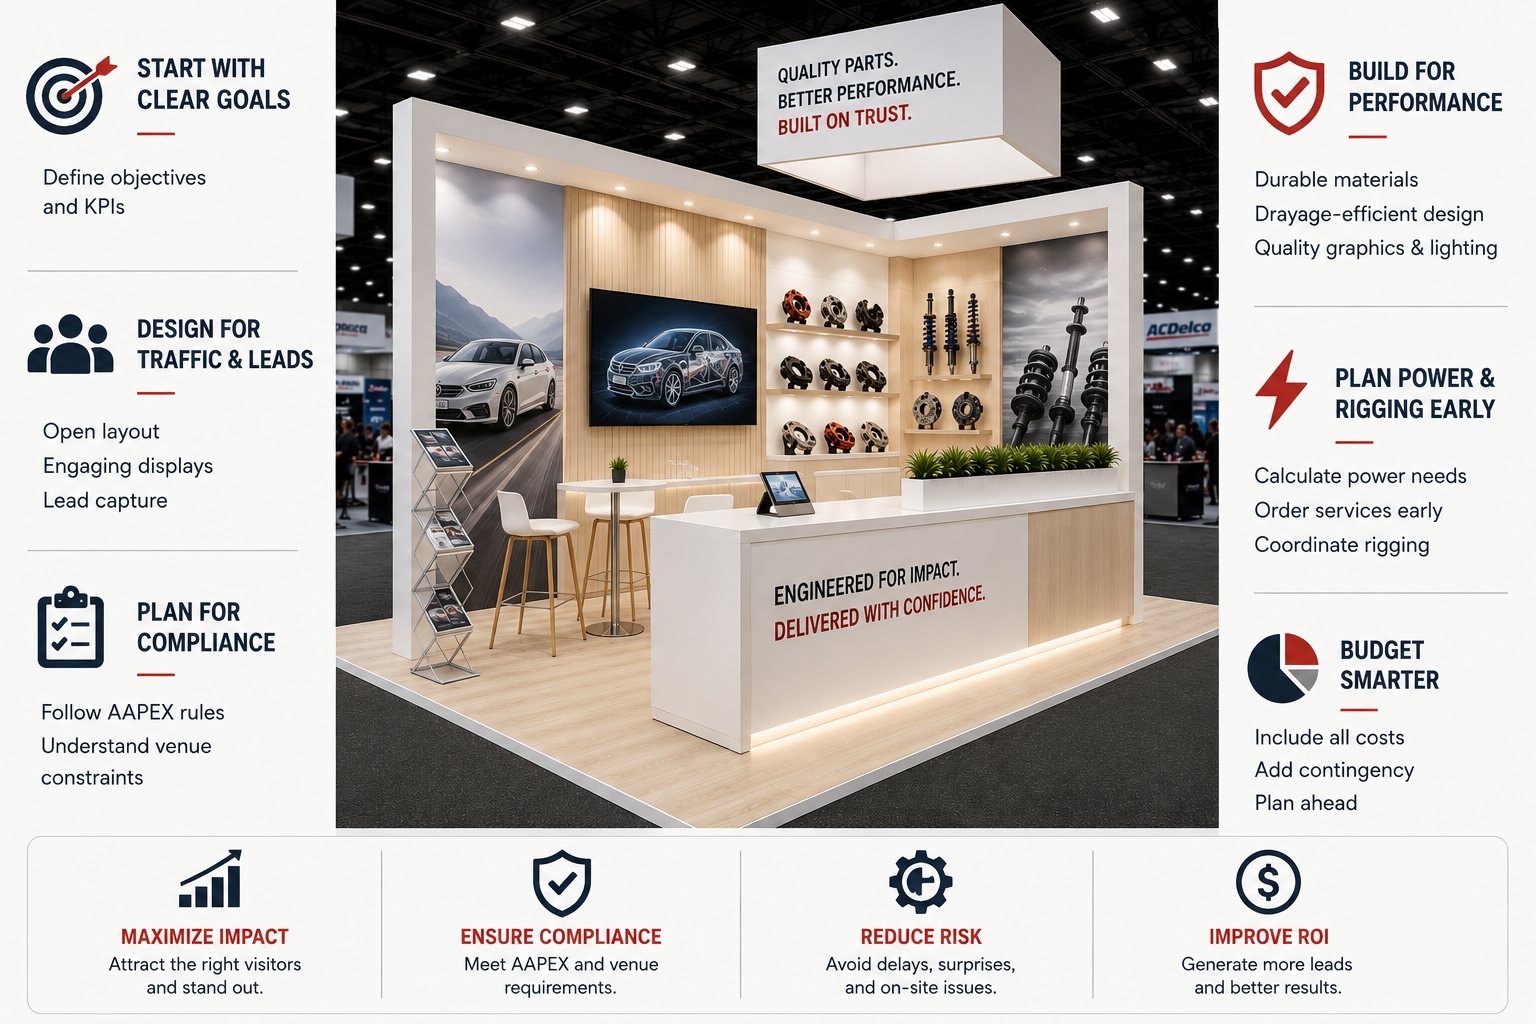
The quick answer is useful, but the value lives in the details. Below I share how I translate goals into layouts, navigate AAPEX’s regulations, plan realistic budgets, and make construction decisions that reduce risk while boosting presence. These are the field-level choices that separate a smooth week from a salvage job.
How should AAPEX booth design align with measurable goals?
Many teams chase aesthetics first, then bolt on function. That causes costly rework. The tension is real: space is limited, and goals compete. The solution is to anchor AAPEX booth design to a short list of quantified outcomes and build the layout, content, and staffing plan around them.
A good AAPEX booth design starts with 3–5 measurable outcomes, translates them into zones and lead flows, and limits distractions. Define who you must attract, what they must see, and how you will capture data. Then pick elements—demos, meeting areas, signage—based on those outcomes, not on generic “wow factor.”
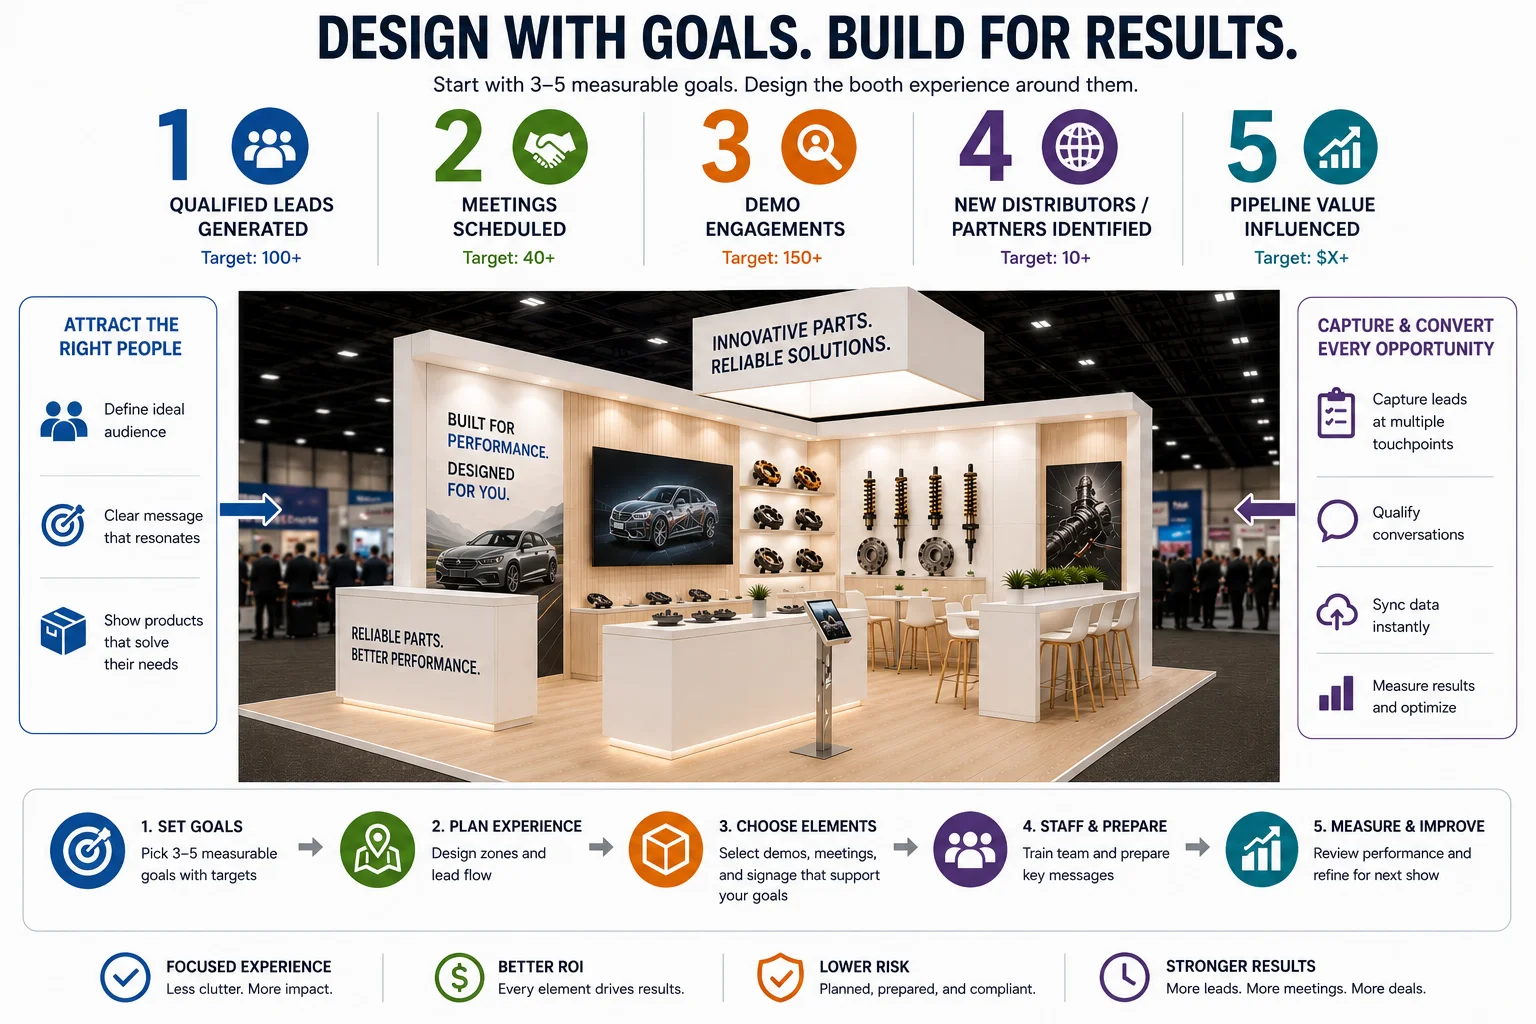
Translate outcomes into layout
- Define goals before drawings. Examples:
- 200 qualified distributor conversations
- 50 scheduled OEM meetings
- 3 product launches with demos every hour
- Map a visitor path:
- Attraction line at the aisle
- Demo line at mid-depth
- Conversion line at back-of-house meeting or scanning station
Design decisions that serve goals
- Entry strategy:
- High-read branding at 14–18 ft for islands (if permitted)
- “What-we-do” statements at 6–8 ft lead-in height
- Demo architecture:
- Waist-high counters for samples and small hardware
- Short product pedestals for quick touch-and-go
- Secure, powered bays for live tech
- Lead capture:
- Dedicated scanning positions with power and network
- Clear, low-friction offers (e.g., spec sheets, trial codes)
- QR codes as backup; verify Wi-Fi or plan hardline drops
Metrics and tools
- Use the official lead retrieval system plus a backup scanning app
- Tag leads by zone/session to learn what works
- Track dwell time at demo areas (simple observation sheets can work)
When I plan AAPEX booth design, I write goals on the first page of the drawing set. That avoids the “where do we put the scanner?” scramble on day one. It also stops the layout from growing into a maze of features that look good but do not convert.
Which AAPEX booth design rules and venue constraints matter most?
Regulations are easy to skim and painful to fix on site. The pain is space and height, especially for inline lines-of-sight and hanging sign restrictions. The solution is to design to AAPEX’s Exhibitor Manual specifics and verify every assumption with the current General Service Contractor.
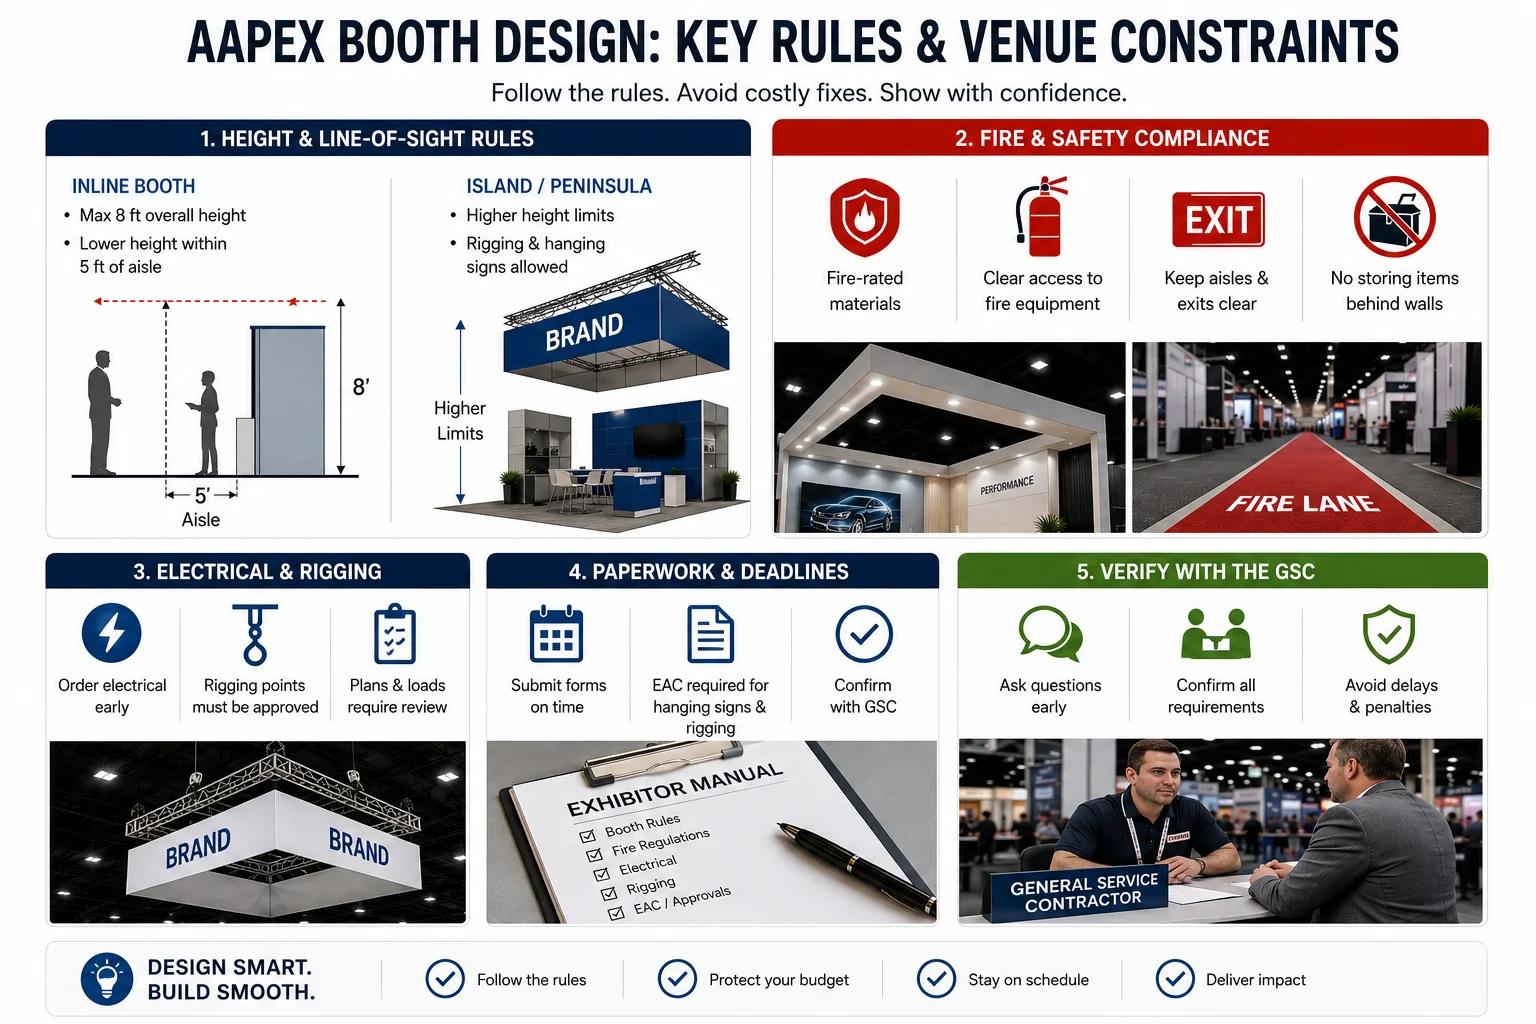
AAPEX booth design must fit the show’s height, line-of-sight, and safety rules. Inline booths typically cap at 8 ft with lower height near aisles; islands and peninsulas have higher limits and rigging options.1 Fire codes apply to covered ceilings, fabrics, and storage. Electrical, rigging, and EAC paperwork require early submission and verification.
Plan to the rulebook (and verify)
- Heights and lines-of-sight:
- Inline/linear booths: commonly 8 ft max back-wall height, with a 4 ft height limit in the front 5 ft of depth. Keep tall elements away from the aisle edge.
- Peninsula/island: typical maximums range from 16–20 ft; confirm the AAPEX manual for the current year. Hanging signs are usually allowed for islands and sometimes peninsulas, subject to approval.2
- Fire and life safety:
- All fabrics and certain substrates must be flame retardant; carry certificates.3
- Enclosed ceilings over a threshold area may require smoke detection and sprinklers or open-grid design; engage a qualified engineer.4
- No fuel-powered equipment indoors without specific compliance steps; verify any fluid or compressed gas usage with the fire marshal.5
- Electrical and utilities:
- Standard 120V for small devices; 208V single or three-phase for machinery and LED walls.6 Request 24-hour power for servers or refrigerators.
- Plan cable management and GFCI where necessary; use UL-listed devices. The venue electrical contractor must place and energize services.
- Rigging and structures:
- Submit rigging plans with load data. The venue typically requires engineered drawings for hanging signs and large structures.7 All hardware must be rated.
- Material handling (drayage):
- Weight drives cost.8 Use crated, skidded freight. Label everything. Target move-in times matter—align truck arrivals to avoid delays.
- Labor and EAC:
- Las Vegas has specific labor jurisdictions. An Exhibitor Appointed Contractor (EAC) must register and provide insurance.9 Verify supervision rules and straight-time/overtime windows.
I keep a compliance sheet on site with all approvals. If a floor manager asks, I show the documents. That saves hours. It also prevents avoidable teardown and rebuild when an aisle sightline is blocked.
How do we engineer traffic flow and lead capture in AAPEX booth design?
Crowded aisles can overwhelm staff and block demos. A vague plan means missed scans and poor data quality. The fix is a flow pattern with a clear front “attractor,” a mid-depth demo line, and a back-of-house conversion point that guides visitors and staff.
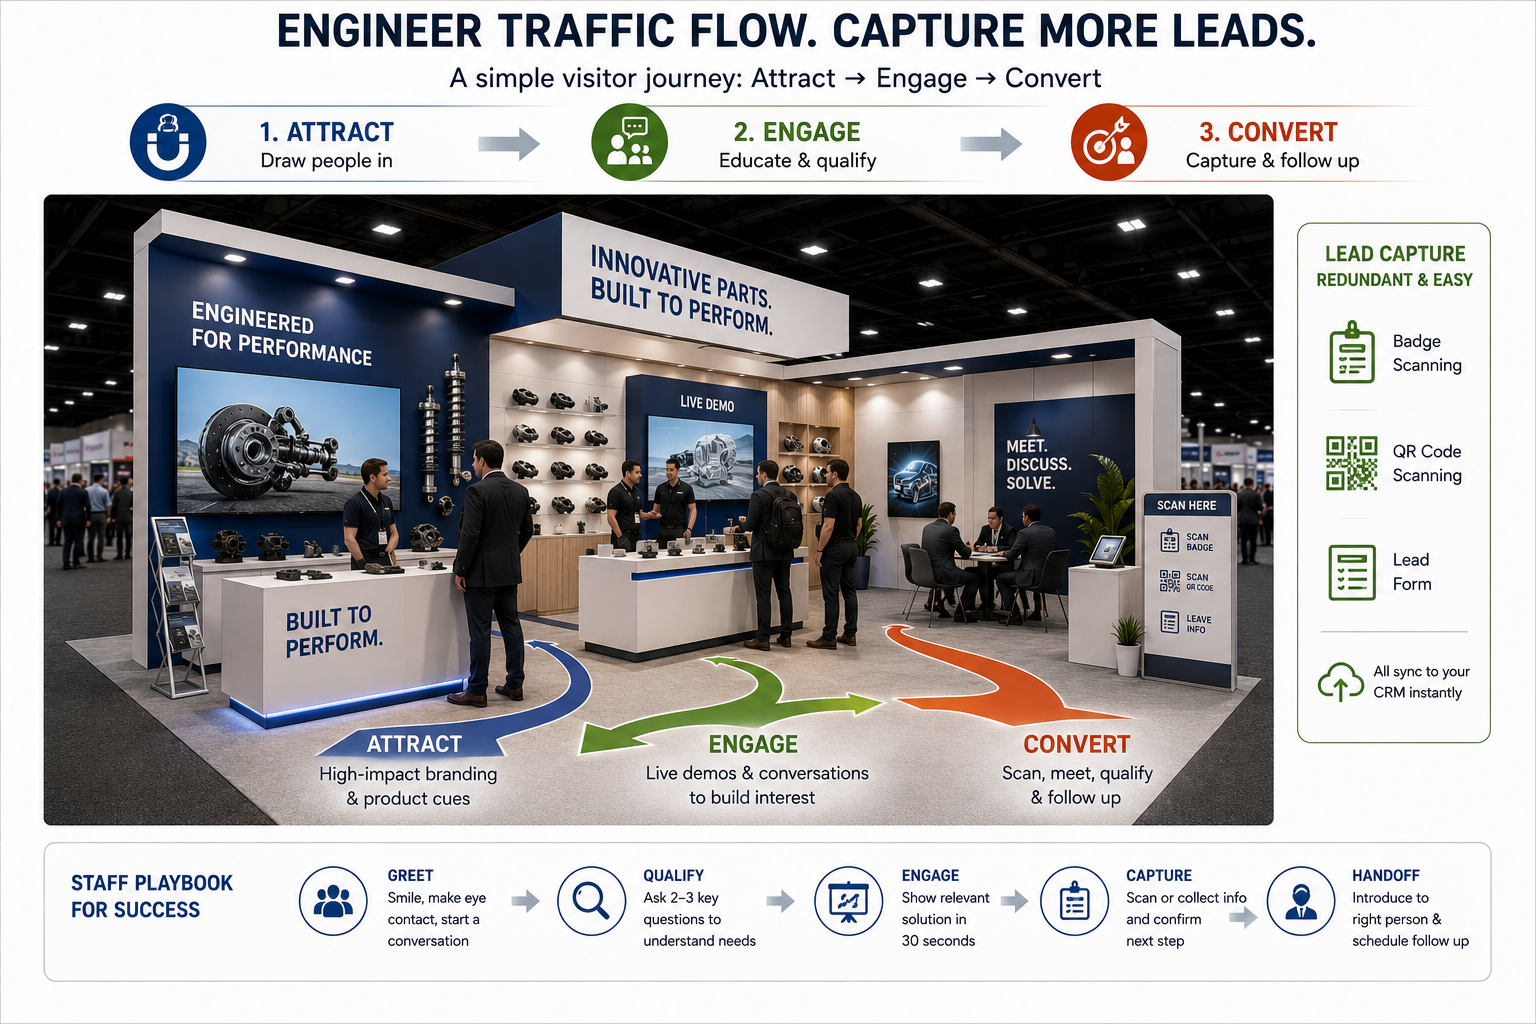
Effective AAPEX booth design creates a simple visitor journey: attract, engage, convert. Place high-contrast branding and product cues at the front, run structured demos at mid-depth, and move qualified visitors to scanning or meetings at the back. Provide redundant scanning options and train staff on a 30-second handoff.
H3: Define your attractors
- High-read messages: 5–7 words that say what you do, not just your name
- Physical attractors: moving parts, LED content, hero products, live builds (if allowed)
- Lighting: 300–500 lux at the front line, warmer accent on hero products
H3: Structure demos for throughput
- Timeboxed demos: 5–7 minutes; post schedules on a small side monitor
- Small stages or demo counters with 3–4 viewing positions each
- Noise control: directional speakers; avoid bleed into aisles
H3: Lead capture architecture
- Scanning stations:
- One at each demo, one in the meeting zone
- Power, network, and a spare tablet at each point
- Data model:
- Qualify with 3–5 tags (market, product interest, timeline, role)
- Use note fields for next steps; map to CRM fields
- Backup:
- QR codes to a form with minimal fields if scanners fail
- Paper fallback sheets pre-printed with key questions
H3: Flow controls and staffing
- Wayfinding:
- Floor arrows or subtle footers on counters
- Staff placed at choke points as ushers, not blockers
- Capacity planning:
- Estimate traffic by time and staff accordingly
- Set a “one in, one out” policy for micro-theaters to keep lines clear
In my builds, moving a demo station just 3 feet once cut aisle congestion in half and increased scans by 30%. I rely on tape marks in the drawing and on the floor during install, so the final positions match the plan.
Which materials and structures deliver impact without headaches in AAPEX booth design?
Materials that look premium can be heavy, fragile, or slow to build. That drives drayage and labor costs. The answer is to combine modular aluminum frames with SEG fabric, strategic MDF millwork, and engineered connections that balance rigidity, finish quality, and speed.
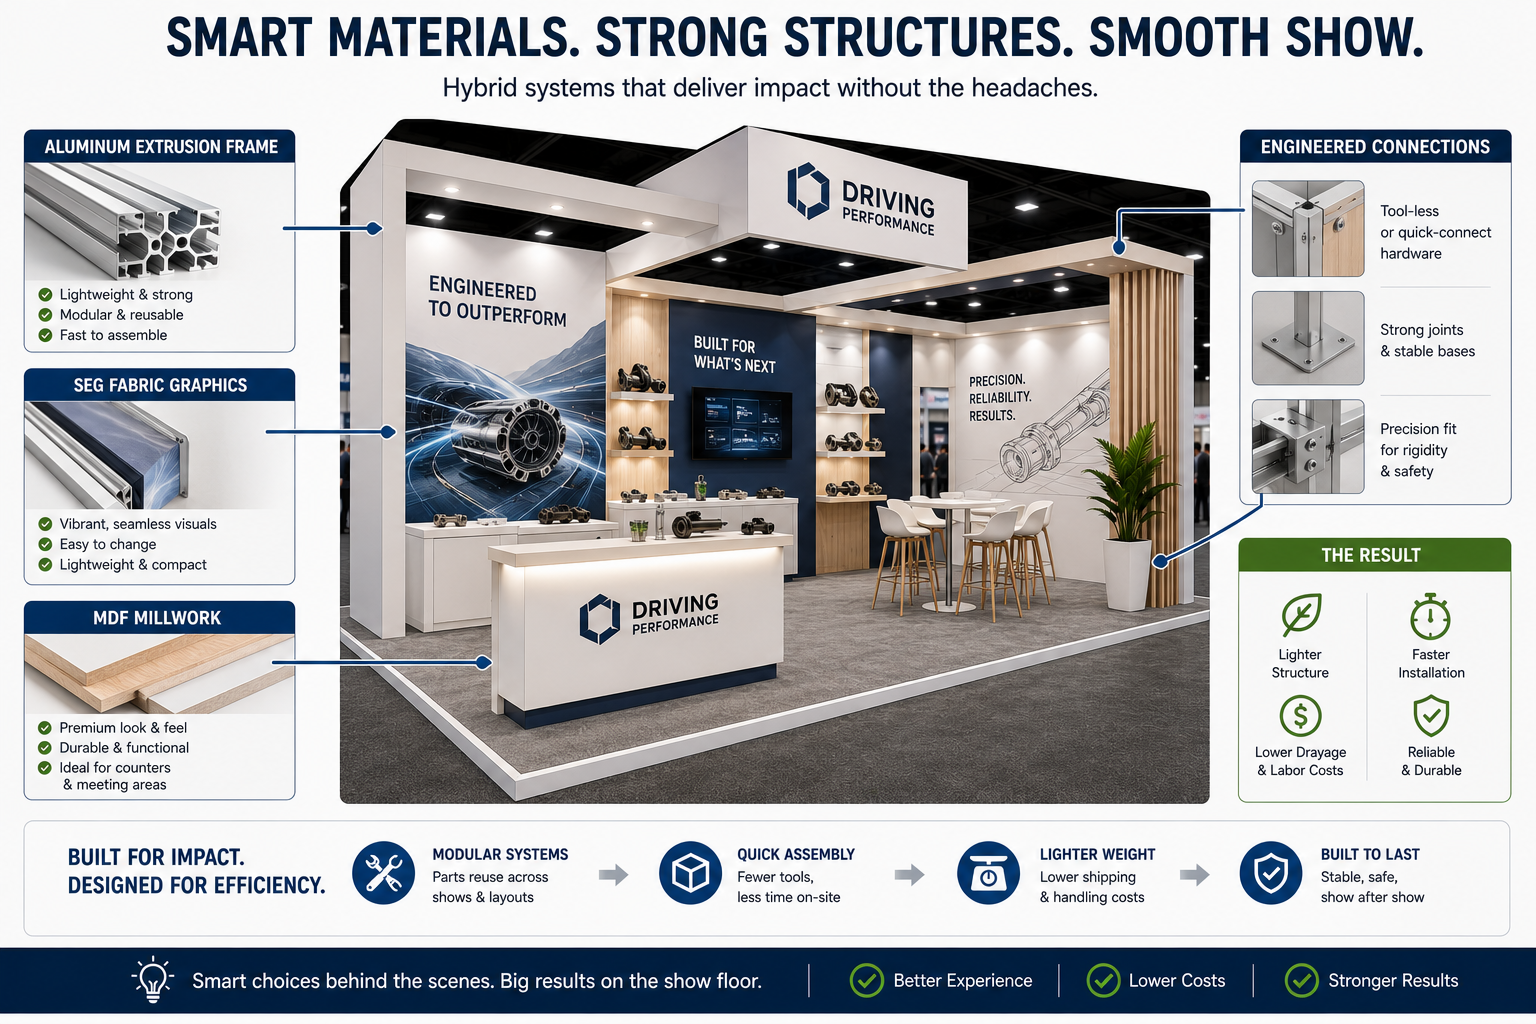
AAPEX booth design gains impact with hybrid systems: aluminum extrusion for frames, SEG fabric for big visuals, and laminate millwork where touch and durability matter. Choose tool-less or quick-connect hardware to speed installs. Engineer joints and bases for stability. Reduce weight to cut material handling and shipping costs.
H3: Hybrid systems approach
- Frames: aluminum extrusion systems with compatible connectors
- Skins: SEG (silicone-edge) fabric for large graphics; hard panels for impact zones
- Millwork: laminated MDF or plywood for counters and storage; edge banding for durability
H3: Weight, finish, and speed trade-offs
- Drayage is billed by weight—every 100 lb saved matters
- Fabric graphics travel light and reduce damage risk
- Hard walls signal premium quality at touch points and demo areas
H3: Durability and compliance
- Flame-retardant certificates for fabrics
- UL-listed power components and correct gauge cabling
- Anchoring: base plates sized for stability; concealed ballast where necessary
Material options comparison
| Component | Option | Pros | Cons | Best Use Cases |
|---|---|---|---|---|
| Structural wall | Aluminum extrusion + SEG | Light, fast, large seamless visuals | Less tactile premium than hard walls | Back walls, lightboxes, branded surfaces |
| Structural wall | Laminated MDF/plywood | High-end finish, rigid, durable | Heavier, longer install time | Counters, demo bays, product shelves |
| Ceiling/headers | Fabric baffles or frames | Lightweight, easy rigging/ground-support | Requires careful tensioning | Accent lines, acoustic softening |
| Flooring | Raised platform (lightweight) | Cable management, stage effect | Adds weight and install complexity | Heavy demo wiring, perimeter lighting |
| Graphics | SEG fabric + lightbox | Bright, clean, swappable | Requires profiles and correct sizing | Hero visuals, brand storytelling |
I have shifted many AAPEX builds from full laminate walls to SEG fabric wherever touch is not required. The net was a lighter, faster structure that still felt premium at the counters and demo pods. The crew appreciated tool-less connections; the client appreciated lower overtime risk.
How should you budget and schedule an AAPEX booth design project?
Budgets often ignore drayage, electrical, and I&D overtime. Timelines skip approvals and graphics proofing. The result is rush charges and compromises. The fix is a holistic budget and a reverse-planned schedule with locked milestones.
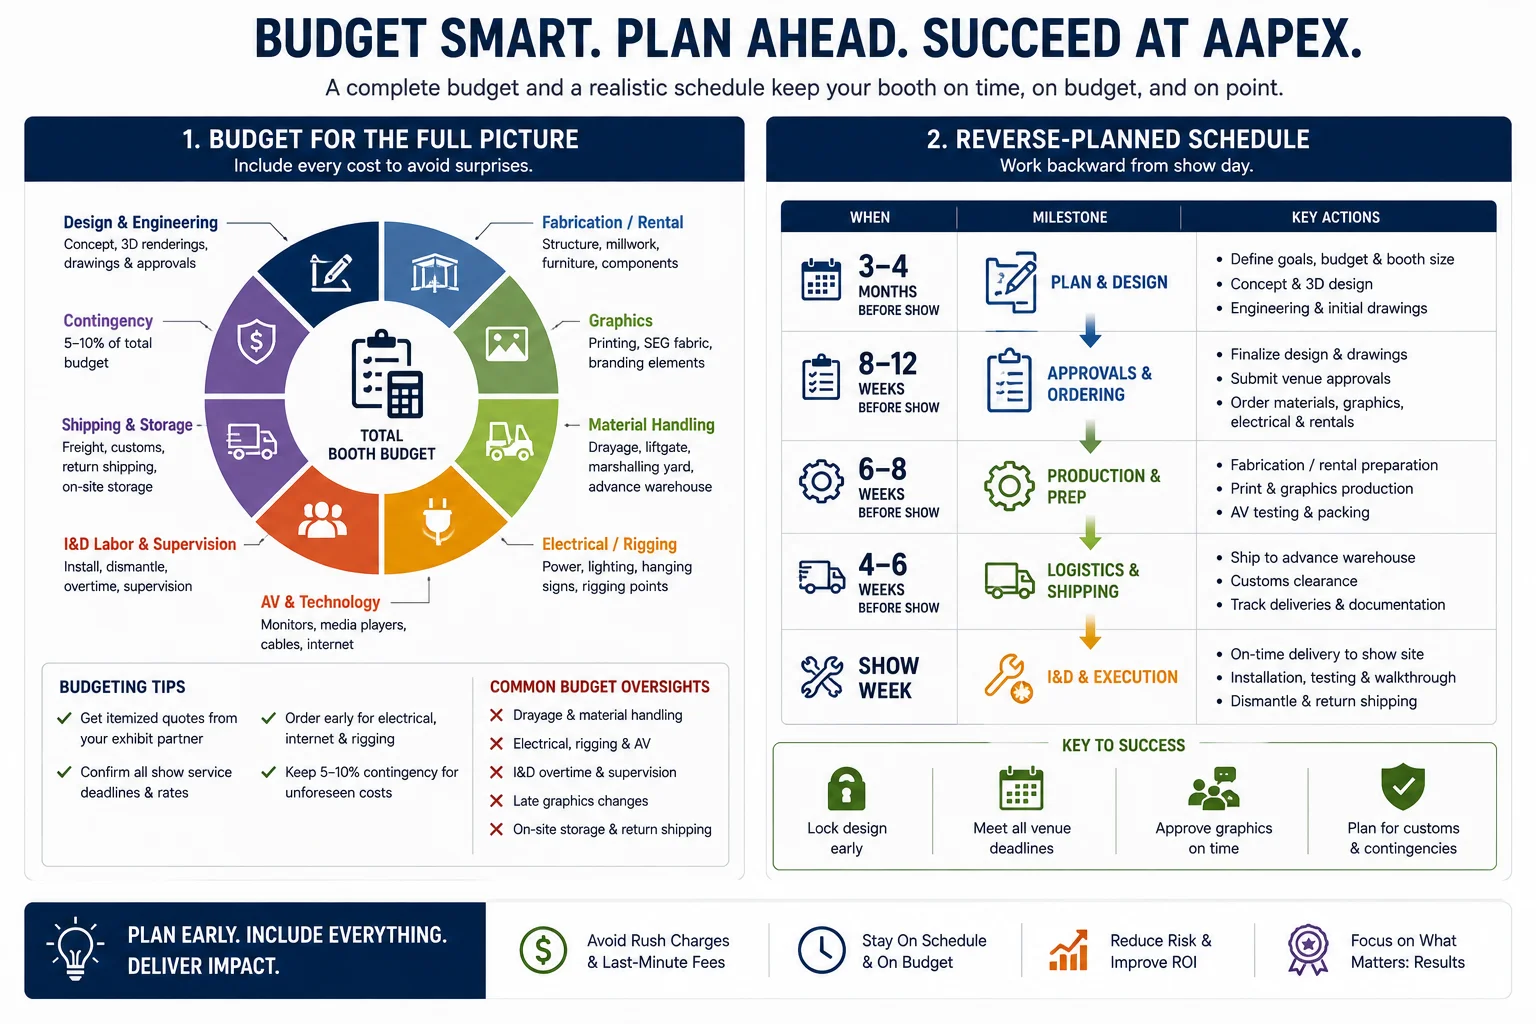
AAPEX booth design budgets must include design, fabrication or rental, graphics, material handling, electrical/rigging, AV, I&D labor, supervision, shipping, storage, and contingencies. Build a three- to four-month timeline for customs and two months for rentals. Lock drawings early, submit approvals on time, and avoid late graphics changes.
H3: Budget categories and typical allocations
- Design and engineering: 10–15%
- Structure (rent or buy): 30–50%
- Graphics production: 10–15%
- AV/LED and lighting: 10–20%
- Electrical and rigging services: 5–15%
- Material handling (drayage): 5–15%
- I&D labor and supervision: 10–20%
- Logistics (freight, target move-in): 5–10%
- Contingency: 5–10%
Percentages vary by complexity. Large LED walls push AV and electrical up. Heavy millwork pushes drayage and labor up.
H3: Timeline that works
- T–16 weeks: Define goals, budget range, and brief; select supplier
- T–12 weeks: Concept approval; start engineering; submit preliminary utilities
- T–10 weeks: Final design lock; order materials; book AV; draft rigging plan
- T–8 weeks: Submit electrical, rigging, and EAC documents; initial graphics proofs
- T–6 weeks: Fabrication; confirm logistics; finalize content for AV
- T–4 weeks: Graphics final; pack and crate; prewire electrical plans
- T–2 weeks: Ship to advance warehouse; reconfirm target move-in and labor
- Show week: Supervise install; test; set spares and tools; handoff to staff
H3: Cost control tactics
- Rent hybrids where appropriate; buy re-usable elements
- Standardize panel sizes to reuse graphics
- Ship dense and protected to avoid damage—and re-fabrication
- Book straight-time labor windows; avoid last-minute scope creep
- Submit forms early to capture discount deadlines
I have seen late graphics swaps trigger rush reprints and Saturday overtime installs. A disciplined proofing and lock date prevents that chain reaction. Treat the schedule as a production calendar, not a wish list.
Do LED video walls and power plans improve AAPEX booth design ROI?
LED walls draw crowds but can strain power and budgets. Poor content and underpowered circuits undermine impact. The solution is to right-size pixel pitch, engineer power properly, and feed content that earns pauses, not just glances.
LED can lift AAPEX booth design ROI when content is concise and the system is engineered. Choose indoor tiles around 2.6–3.9 mm pitch, plan for average power consumption per cabinet with peak headroom, and specify dedicated circuits. Use redundancy in processors and keep content readable from 10–30 feet.
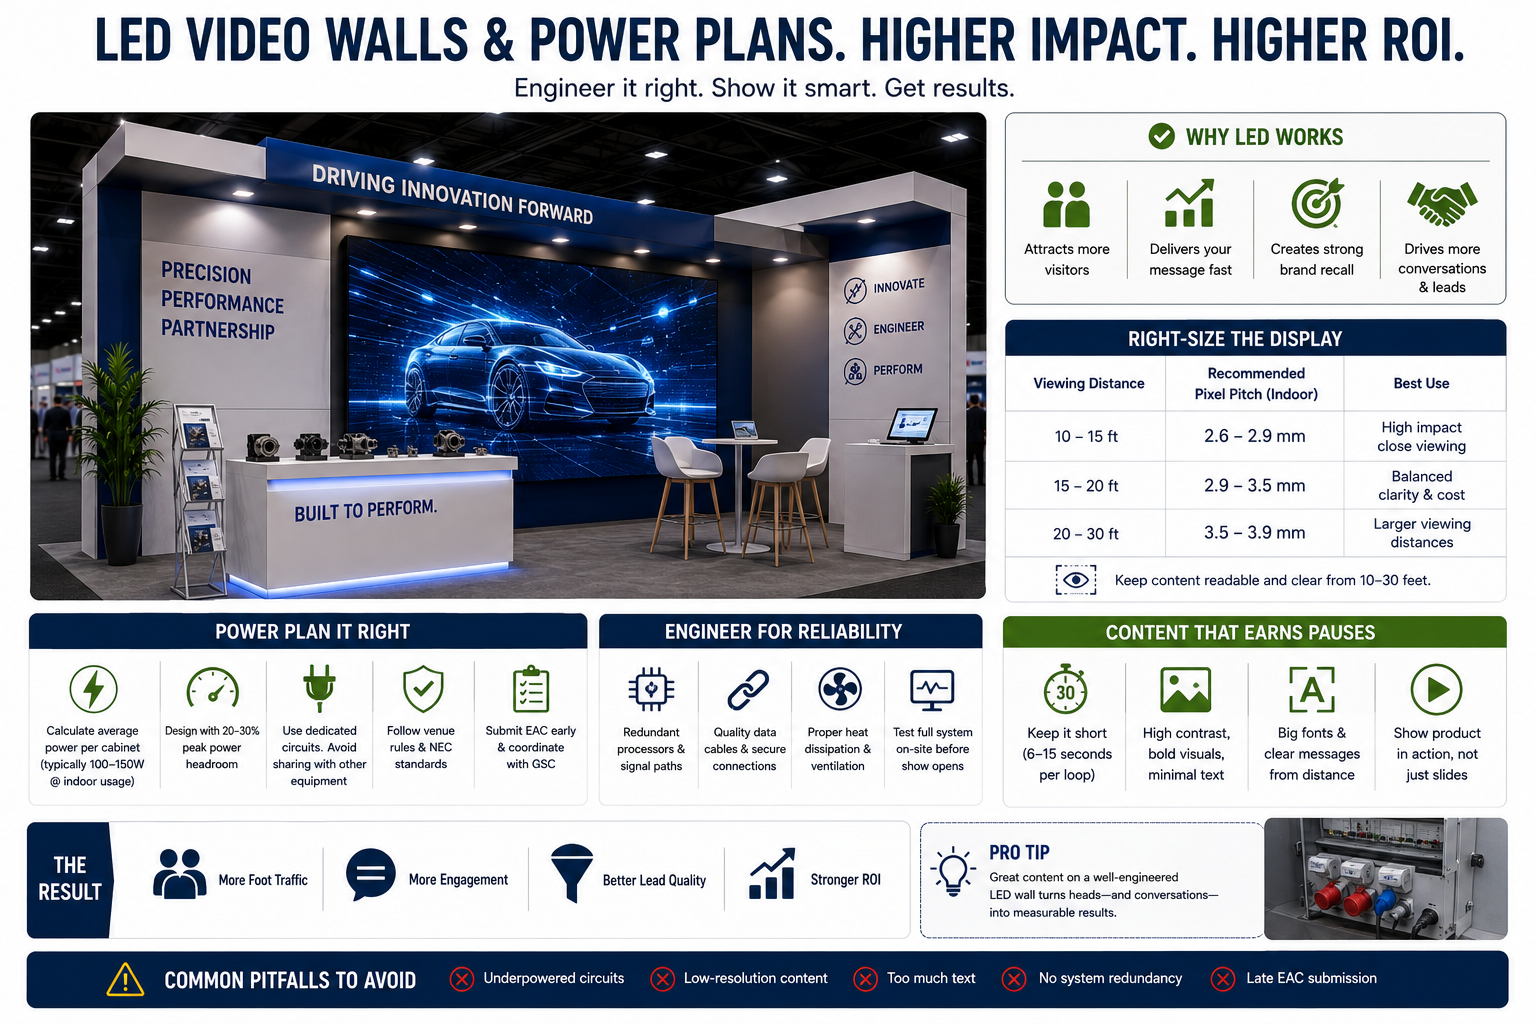
H3: Spec the right LED
- Pixel pitch:
- Brightness:
- Aspect ratios and sizes:
- Match content to screens; avoid letterboxing that wastes real estate
H3: Engineer power and signal
- Power capacity:
- Ask vendors for both peak and average draw per cabinet; add 25–30% headroom
- Distribute load across circuits; avoid daisy-chaining beyond rated capacity
- Dedicated circuits:
- Separate LED from general circuits; add a 24-hour feed if needed
- Signal:
- Primary and backup processors and feeds; clean cable runs with slack
H3: Content and acoustics
- Content:
- 5–7 second loops to capture aisle traffic; high contrast; minimal text
- Product demos with captions for noisy floors
- Audio:
- Directional speakers; comply with show audio policies
- Integration:
- LED as the attractor; demo stations that pay off the interest
I have had LED walls pay off when the message fit the viewing window and the power plan was conservative. A few extra circuits cost less than a dark screen on day one. Always bring spare tiles and cables; a single bad module can be swapped in minutes if you are prepared.
What about meeting rooms, storage, and back-of-house planning?
Hidden spaces often get ignored, then undermine the experience. Storage in non-compliant areas can draw citations. The fix is to design back-of-house with the same rigor as the front: compliant storage, ADA considerations, and staff flow.
Back-of-house details make AAPEX booth design work in practice. Build a lockable storage closet that meets fire rules, include coat and bag shelving, and design meeting rooms with proper ventilation and sound control. Provide a staff-only path to avoid crossing demos with boxes and supplies.
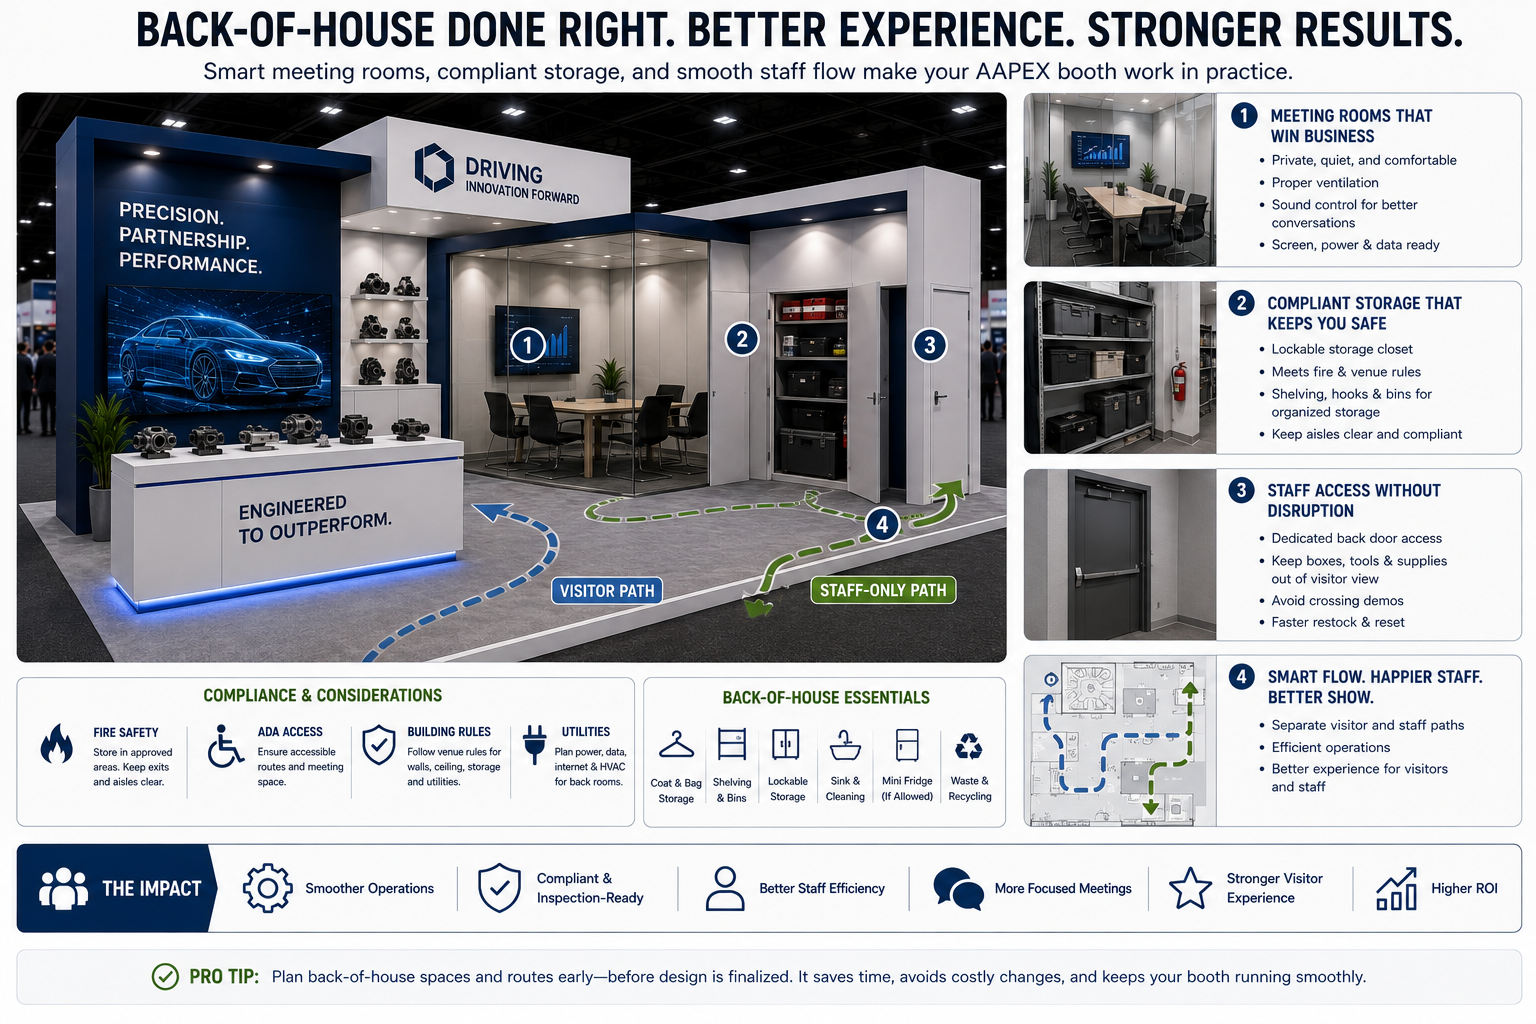
H3: Storage and compliance
- No storage behind drape or under raised platforms unless compliant
- Use rated cabinets and keep access clear
- Allocate a battery charging station with ventilation
H3: Meeting rooms that function
- Glass tops at 7–8 ft for semi-private zones; hard walls for full privacy
- Soft finishes to dampen sound; hidden cable runs for laptops
- Adequate ventilation and lighting; avoid hot spots near lighting rigs
H3: Staff flow and welfare
- Staff-only path between storage and demo/meeting zones
- Hidden waste bins and replenishment caches
- A small prep table with power for last-minute materials
I make a “shadow plan” for staff paths and storage. It protects the customer experience and keeps floor managers happy. It also reduces trip hazards and keeps the booth tidy without constant policing.
Frequently Asked Questions
What is a sensible first-time booth size at AAPEX?
For many new AAPEX exhibitors, a 10×20 inline or a 20×20 island is a practical start. The decision depends on goals, budget, and product demo needs. Inline booths limit height and rigging but control costs. Islands offer visibility and flow, but increase complexity, utilities, and build labor.
Can I use the same exhibit for AAPEX and SEMA?
Often yes, but plan for differences. AAPEX and SEMA run concurrently but in different venues with distinct rules.12 Heights, rigging policies, and utilities can differ. Design modular elements that adapt and verify each show’s manual. Logistics and labor bookings must consider overlapping install schedules.
How early should I book electrical and rigging services?
Submit electrical and rigging orders by the early-bird deadlines, typically 6–8 weeks before show. Provide engineered drawings and load data for hanging signs. Late orders risk limited time slots, overtime installs, and approval delays that cascade into compressed build schedules.
What compliance documents should I carry on-site?
Carry flame retardant certificates for fabrics, structural drawings for large elements, rigging approvals, electrical orders, and EAC insurance and registrations. Keep copies in both print and digital formats. Floor managers may request them at any time, especially for hanging structures and enclosed ceilings.
How do I reduce material handling (drayage) costs?
Reduce weight and volume. Use aluminum frames and fabric graphics for large surfaces, standardize crate sizes, and ensure skids are well-constructed. Label all freight clearly with booth and target times. Consolidate shipments to the advance warehouse to avoid off-target penalties at the marshaling yard.
Conclusion
AAPEX booth design succeeds when it ties business goals to engineered layouts, respects venue rules, and uses materials and techniques that deliver impact without surprises. Start with measurable outcomes, build for traffic and lead capture, and plan budgets and utilities early. If you want a grounded second opinion or a build partner in Las Vegas, my team at Exhibitsmax is here to help you execute with confidence.
"Guidelines for Display Rules and Regulations", https://exhibitorpages.com/AMC-2025/AMC-2025-display-guidelines.pdf. Industry display rules, such as the IAEE Display Rules & Regulations and show-specific exhibitor manuals, describe linear booths as generally limited to an 8‑foot backwall with lower height limits near aisles, while island and peninsula booths may be allowed higher structures and rigging subject to the event’s approval. Evidence role: definition; source type: institution. Supports: That standard linear (inline) booths are typically limited to an 8 ft backwall with lower height limits toward aisles, and that island/peninsula booths may allow greater heights and rigging as governed by show rules.. Scope note: Exact height and rigging allowances are event-specific and can change annually; exhibitors should confirm with the current AAPEX manual. ↩
"IAEE Guidelines FAQs - AFP 2026", https://conference.financialprofessionals.org/exhibitors-sponsors/exhibitors/i-am-an-exhibitor/iaee-guidelines-faqs. Standard display guidelines and exhibitor manuals note that hanging signs are commonly permitted above island booths and occasionally peninsulas, but only with prior show authorization and compliance with rigging requirements. Evidence role: definition; source type: institution. Supports: That common U.S. trade show rules permit hanging signs for island booths and sometimes peninsulas, subject to show management approval.. Scope note: Policies vary by event and venue; consult the current AAPEX Exhibitor Manual for definitive allowances. ↩
"Flame Retardant Chemicals and Fabrics | OSFM - CA.gov", https://osfm.fire.ca.gov/what-we-do/fire-engineering-and-investigations/flame-retardant-chemicals-and-fabrics. Local fire prevention rules for trade shows in Las Vegas require exhibit materials such as decorative fabrics to be flame retardant and subject to inspection, with valid certificates of flame resistance available on site. Evidence role: general_support; source type: government. Supports: That exhibit fabrics and specific materials must meet flame-retardant standards and be documented for inspection at Las Vegas venues.. Scope note: Requirements can differ by venue and material type; exhibitors must follow the current directives of the authority having jurisdiction. ↩
"Southern Nevada Consensus Fire Code Amendments", https://files.lasvegasnevada.gov/fire-rescue/2018-IFC-SNFC-with-Supplemental.pdf. Fire code guidance for trade shows in Las Vegas stipulates that enclosed exhibit ceilings beyond specified sizes require approved smoke detection and/or sprinkler coverage, or must use open-grid designs to satisfy life safety provisions. Evidence role: general_support; source type: government. Supports: That enclosed exhibit ceilings exceeding defined areas trigger requirements for smoke detection, sprinklers, or open-grid treatments under local fire codes.. Scope note: Exact thresholds and options vary by code edition and venue; the fire marshal’s current guidance controls. ↩
"permit-by-inspection-assembly-exhibit.pdf", https://www.clarkcountynv.gov/adobe/assets/urn:aaid:aem:823d4283-1ea6-4a6b-83a1-e32cc348db40/original/as/permit-by-inspection-assembly-exhibit.pdf. Local fire prevention requirements for trade shows restrict indoor use of internal combustion engines and compressed gases, requiring specific safeguards and prior approval from the fire authority having jurisdiction. Evidence role: general_support; source type: government. Supports: That indoor display of fuel-powered equipment and use of compressed gases are regulated and require compliance measures approved by the fire authority.. Scope note: Specific allowances and procedures vary by venue and code; exhibitors must follow the current fire marshal directives. ↩
"EDLEN Electrical Exhibition Services at Tampa Convention ...", https://www.tampa.gov/sites/default/files/document/2025/edlen-electrical-exhibition-at-tcc-show-organizers-2026_0.pdf. Exhibitor electrical service guides for major Las Vegas venues list 120‑volt circuits for general devices and 208‑volt single‑ or three‑phase services for higher‑load equipment such as machinery and display walls. Evidence role: general_support; source type: institution. Supports: That The Venetian Expo and similar venues supply 120V circuits and offer 208V single- and three-phase power for higher-demand equipment.. Scope note: Available voltages, plug types, and ordering procedures vary; check the current venue service manual. ↩
"1926.251 - Rigging equipment for material handling.", http://www.osha.gov/laws-regs/regulations/standardnumber/1926/1926.251. Rigging guidelines for Las Vegas exhibit halls require submittal of engineered drawings and load specifications for hanging signs and other large suspended elements as a condition of approval. Evidence role: general_support; source type: institution. Supports: That venues require engineered drawings and load data for hanging signs and large suspended structures before approving rigging.. Scope note: Submittal formats and review timelines vary by venue and year; consult the current AAPEX/venue rigging instructions. ↩
"Material Handling FAQs", https://www.exhibitoronline.com/topics/article.asp?ID=2808. Exhibition industry definitions and exhibitor guides explain that material handling (drayage) fees are commonly calculated by shipment weight, typically assessed per hundredweight (CWT) for inbound and outbound handling. Evidence role: definition; source type: institution. Supports: That standard material handling charges at U.S. trade shows are assessed based on shipment weight, often per hundredweight (CWT).. Scope note: Pricing methods can vary by contractor and show; consult the current AAPEX material handling rates. ↩
"Exhibitor Appointed Contractors (EAC) Terms and Conditions", https://www.electricalwireshow.com/exhibitor-appointed-contractors-eac-terms-and-conditions. Show manuals and industry guidelines specify that Exhibitor Appointed Contractors (EACs) must register with event management and provide proof of insurance before performing services in the exhibit hall. Evidence role: definition; source type: institution. Supports: That Exhibitor Appointed Contractors must register with show management and furnish insurance documentation before working on site.. Scope note: Exact forms and insurance limits vary by show; refer to the current AAPEX EAC instructions. ↩
"About pixel pitch and viewing distance for LED walls", https://www.barco.com/en/news/news-insights/2020-03-11-ledtalks-what-is-pixelpitch. AV industry guidance relates pixel pitch to viewing distance, indicating that sub‑4 mm indoor LED pitches are commonly selected to balance readability and cost at typical exhibit floor sightlines. Evidence role: expert_consensus; source type: education. Supports: That recommended pixel pitch is tied to expected viewing distance, with sub‑4 mm indoor pitches commonly advised for mid‑range trade show viewing.. Scope note: Guidelines provide relationships rather than fixed ranges; the precise pitch depends on actual content and viewing distances. ↩
"LED display brightness: How many nits are needed for ...", https://www.linkedin.com/pulse/led-display-brightness-how-many-nits-needed-indoor-vs-dylan-lian-jbaec. Reference discussions of LED display technology note that indoor LED walls are operated at substantially lower luminance than outdoor units, with typical indoor levels around the low‑thousands of nits or less and adjusted to suit ambient light and viewer comfort. Evidence role: general_support; source type: encyclopedia. Supports: That indoor LED displays are generally specified and operated at lower luminance than outdoor units, often around the low‑thousands of nits or less, with adjustments for comfort.. Scope note: Published ranges vary by product and environment; the cited range is contextual rather than a fixed standard. ↩
"Exhibitsmax: Custom Trade Show Booth Builder in USA", https://exhibitsmax.com/. Official event information indicates that AAPEX and the SEMA Show are scheduled concurrently in Las Vegas, with AAPEX hosted at The Venetian Expo and SEMA at the Las Vegas Convention Center under their respective exhibitor regulations. Evidence role: historical_context; source type: institution. Supports: That AAPEX and the SEMA Show are scheduled the same week in Las Vegas but take place at different venues under separate show management and rules.. Scope note: Dates and venues can change year to year; always confirm the current show details. ↩